Welcome to the world of 3D design! This guide is designed to provide you with the fundamental knowledge and skills necessary to design objects for 3D printing. Whether you’re a hobbyist, student, or professional, mastering these basics will set you on the path to creating amazing things with this revolutionary technology.
Types of 3D Printers
There are about ten major categories of 3D printers. The extensive list includes the following, but please note the first two are the most popular by far and are the two that will be the focus of this guide.
- Fused Deposition Modeling (FDM)
- Stereolithography (SLA)
- Selective Laser Sintering (SLS)
- Digital Light Processing (DLP)
- Selective Laser Melting (SLM)
- Electron Beam Melting (EBM)
- Binder Jetting (BJ)
- Material Jetting (MJ)
- Direct Metal Laser Sintering (DMLS)
- Continuous Liquid Interface Production (CLIP)
Software
3D design software and 3D printing software serve distinct yet complementary purposes within additive manufacturing (of which 3D printing is a part). 3D design software, such as Autodesk Fusion 360, Blender, or SolidWorks, focuses on the creation and manipulation of digital models. These tools provide a wide range of features for designing intricate and complex objects, allowing users to sculpt, shape, and refine their creations with precision. In contrast, 3D printing software, often referred to as slicing software (e.g., Ultimaker Cura, Simplify3D), prepares these digital models for physical fabrication. This involves tasks like slicing the digital model into layers, generating support structures, setting printing parameters such as layer height and infill density, and converting the sliced model into machine-readable instructions (G-code) for the 3D printer.
While 3D design software empowers users to unleash their creativity and design prowess, 3D printing software bridges the gap between the virtual and physical worlds, ensuring that digital designs translate seamlessly into tangible objects through the additive manufacturing process. Both are necessary to develop an idea into a physical object that is 3D printed, but they are used in separate steps.
Design Principles for 3D Printing
There are several principles from the Design for Manufacurability (DFM) guidelines that will help designers create 3D printable models. Here they are, adapted for 3D printing:
- Optimize Geometry: Design parts with geometries that are suitable for 3D printing processes. Minimize the need for supports and overhangs, and avoid sharp angles or features that may be difficult to print accurately. (expanded in a section below)
- Ensure Wall Thickness: Maintain uniform wall thickness throughout the design to prevent issues such as warping, deformation, or structural weakness. Avoid thin sections that may be prone to breaking or collapsing during printing. Basically, follow the specifications for the minimum thickness of walls in the manufacturer’s recommendations for your 3D printer.
- Design for Support Structures: When supports are necessary, design parts with consideration for their placement and removal. Minimize the amount of support material required and design supports that are easy to remove without damaging the final part.
- Consider Material Properties: Although 3D printers are typically optimized for only a few types of materials for printing, there is still some room for selection, and materials typically have dis/advantages. Select materials appropriate for the intended application and understand their properties. Design parts with consideration for material characteristics such as strength, flexibility, and temperature resistance to ensure optimal performance. For novices, there are 3D printing material tutorials for both FDM printers and SLA printers., but here is a great overall resource: https://all3dp.com/1/3d-printing-materials-guide-3d-printer-material/.
- Tolerances and Clearances: Design parts with appropriate tolerances and clearances to ensure proper fit and functionality when assembled. Consider factors such as shrinkage, thermal expansion, and material flow during printing. Considered an intermediate skill in 3D design, creating parts that will fit together require an understanding of the accuracy and tolerance of the printer. For example, with the UR IS Ultimaker 3 FDM printer, a cylinder that must fit into a hole without slack but be removable requires designing the cylinder about 1mm smaller in diameter than the hole. This comes from calibration testing and trial-and-error. However, this has been made easier in the last few years because many 3D printing applications support the ability to automatically increase or decrease the “horizontal expansion” and/or “hole horizontal expansion” values to arrive at optimal fitting.
- Reduce Complexity: Simplify designs whenever possible to minimize production time and material usage. Avoid unnecessary features, intricate details, or complex geometries that may increase manufacturing costs or introduce printing difficulties. For example, the UR IS Ultimaker printer is capable of printing with two materials; however, that adds time due to the frequent switch of active extruders. If the parts of the final objective can be printed with the two materials separately and later connected, that represents an optimization.
- 3D-Printing-Specific Considerations: Understand the capabilities and limitations of the chosen 3D printing technology and adjust the design accordingly. Consider factors such as layer resolution, build volume, material compatibility, and post-processing requirements.
- Iterative Design: Embrace an iterative design process, where designs are refined through multiple iterations based on feedback from prototyping and testing. Continuously evaluate and improve the design to optimize manufacturability and functionality. A great example of this comes from the design and fabrication of an instrument used in the Biology Department at UR.
Printability
A general concept in 3D design and printing is printability, and that takes two forms: (1) a manifold design and (2) a design that does not have features that are incompatible with the printer’s capabilities.
Manifold
A 3D design structure that is exported from a 3D design software must have no mathematical errors in the surfaces to allow the 3D printing software to deduce what volumes are inside the object (where plastic filament should be used) and volumes that are not part of the object (that should not have any plastic filament). “Manifold” means that a surface that is defined by faces are connected by edges in such a way that there are no overlaps or gaps between the faces, anywhere within the object. Each continuous shape or surface is also known as a shell. There can be multiple shells in a design for 3D printing, but they must not touch or intersect each other.
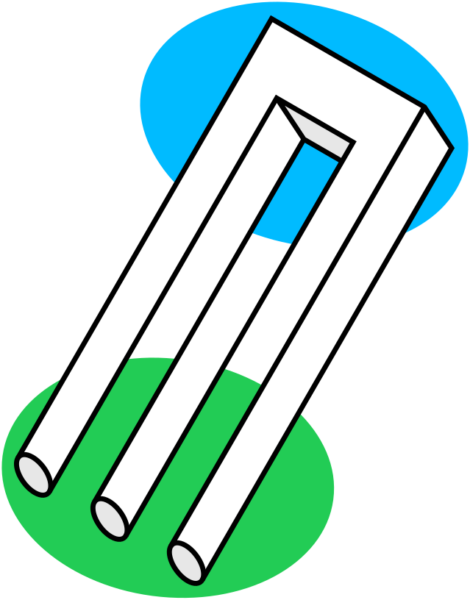
Source: https://en.m.wikipedia.org/wiki/File:Poiuyt–opaque.svg
Perhaps the most well-known example of a non-manifold shape is a point or widget (see image to the right). Depending on which end of the object you study, you will notice that as you try to connect the two in your mind’s eye, you will see that it cannot exist as an object in the real world. This would be one example of a non-manifold, and therefore, non-printable shape. The other examples include scenarios in which two well-defined objects share an edge, or there is a gap/hole in the object.
Preparing Designs for Printing
As mentioned above, one must export the design from the design software and import it into the printing software. There are multiple file formats, but the most common is STL format. The one negative of STL is that it does not contain the units of distance used in the design. Therefore, printing software will usually ask for the units used in the design software for the STL file and/or give the operator a chance to scale the object larger or smaller. Please note that all 3D design and printing software applications default to using millimeters as the base unit.
One disadvantage of STL files is that it cannot contain color information so if you are using an FDM printer that can support multiple colors, you are best using a different file format such as OBJ.