NOTE: This recipe requires activity on two separate days. Read and plan ahead.


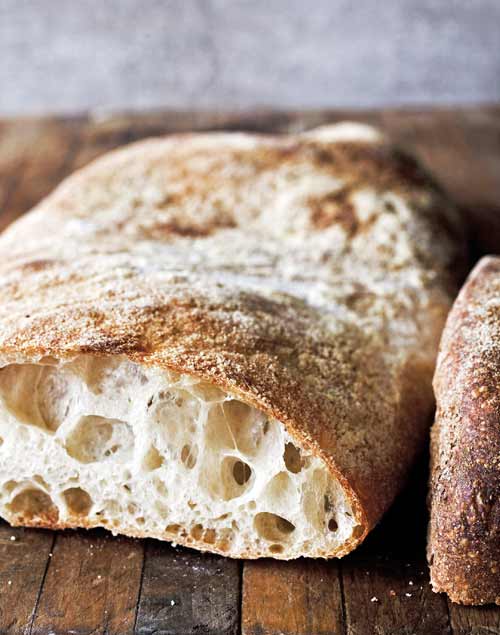
Notice the flatter loaf, crunchy exterior and “holey” interior of the ciabatta bread (above) compared to the traditional white sandwich bread (below) common in the United States. Ciabatta is a risen bread – just like white sandwich bread – the fermentation of yeast given the dough an airy texture, but the dough of ciabatta is very wet – much wetter than traditional bread dough. The flour traditionally used in Italian ciabatta is also lower in protein, and the kneading time is short to limit the formation of a gluten network. When the weaker gluten network is inflated by the steam from the excess moisture (when the bread enters the oven), this results in large holes within a tender bread matrix. While the extra moisture and weaker gluten make for the characteristic larger-than-typical holes in the ciabatta bread structure, the very loose, wet dough can be challenging to work with.
According to Carol Field (author of The Italian Baker) , “have a bowl of water nearby when you are preparing to shape the dough. Yes, the dough is wet, but wet dough won’t stick to wet hands, so dip your hands in the water and then scoop up the dough. It’s fine to have a well-floured work surface, as I instruct, and then scoop out the dough onto it. If the dough seems too sticky for your hands, dip your dough scraper into the water and then use it. Moisten your hands before you roll the dough into a cylinder so it won’t stick as much.”
INGREDIENTS
For sponge – Day 1
A sponge is a fermented “starter” to the dough that gives it more flavor.
-
- 1/8 teaspoon rapid rise or instant yeast
- 1⁄2 cup room-temp water
- 1 cup bread or all-purpose flour
For dough – Day 2
- 1⁄2 teaspoon rapid rise or instant yeast
- 3 tablespoons milk (room temperature)
- 3/4 cup room-temp water
- 1 tablespoon olive oil
- 2 cups bread or all-purpose flour
- 1 1⁄2 teaspoons salt
Note: Rapid Rise Yeast is a particular kind of yeast. Do not Substitute. 
It is important to measure the flour correctly:
MATERIALS
- A stand mixer is preferred for this recipe, using paddle and dough hook (you can also use a food processor- instructions are provided. Because Ciabatta dough is very sticky, I do not recommend mixing this dough by hand – it is a challenge. Do the white sandwich bread if you want to mix by hand). If you need to review how to use a stand mixer or food processor for mixing dough – here are two general videos. These videos are not specific to Ciabatta – which is a wet, stickier dough than the doughs in these videos.
- Plastic spatula or Scraper (hard flat sided spatula)
- Large Glass or plastic bowl lightly sprayed with non-stick cooking spray
- Baking Sheets (2)
- Parchment paper (not wax paper, not foil)
- scissors
- non-stick cooking spray
- kitchen towels
- kitchen thermometer
- cooling rack
- tea kettle or something else to boil water
- serrated bread knife
INSTRUCTIONS
When you see text in boldface blue font. You should document that step with a photo within the narrative on your blog.
Day 1:
- Using the measurements under “For the Sponge”, combine the flour, instant/rapid rise yeast and water in a medium bowl and stir with a wooden spoon until a uniform mass forms. Cover the bowl tightly with plastic wrap and let stand at room temperature for at least 8 hours or up to 24 hours. This step allows the yeast to ferment and generate the flavor for the bread.
NOTE: You could start this part the evening before you intend to make the bread.
Day 2:
The sponge
The sponge has been fermenting for 8-24 hours now. You should see something like this:
Take a photo of your sponge after it has fermented. What are the bubbles from?
Making the Dough
Make the Dough (Stand mixer instructions): Place the sponge and the dough ingredients (flour, salt, yeast, water and milk) in the bowl of a stand mixer fitted with the paddle attachment. Mix on low speed until combined and a shaggy dough forms, about 1 minute, scraping down the bowl and paddle as needed. Increase the speed to medium-low and continue mixing until the dough becomes a uniform mass that collects on the paddle and pulls away from the sides of the bowl, 4 to 6 minutes. Change to the dough hook and knead the bread on medium speed until smooth and shiny (the dough will be very sticky), about 10 minutes. Remove the dough hook.
Before covering dough – do the windowpane test as described below.
Cover the bowl tightly with plastic wrap, and let dough rise at room temperature for about 1 hour.


~images from https://www.browneyedbaker.com/ciabatta-bread/
Making the dough (food processor instructions):
1. In a separate bowl, using the measurements under For the Dough – add the water, the oil, and the sponge – mix, squeezing the sponge between your fingers if necessary to break it up.
2. In the mixing bowl of the food processor fitted with the dough blade and using the measurements under For the Dough, place the flour (use proper flour measuring techniques!), yeast and salt in the food and pulse several times to sift the ingredients. With the machine running, pour the milk/water/sponge mixture through the feed tube and process until the dough comes together.
3. The dough will be very sticky. After the dough comes together, process about 45-60 seconds longer to knead. Mixture should not be stiff enough to be gathered into a ball, nor should it be runny like a batter. It should be elastic and resilient, about the consistency of melted mozzarella cheese. Add a little more water if it is too stiff.
4. Perform the windowpane test as described below
5. Using a spatula or scraper sprayed with cooking spray, transfer the dough to a large bowl, cover tightly with plastic wrap, and let it “puff up” for about 1 hour.
Windowpane test
1. Perform a windowpane test on your dough to see if the gluten matrix has developed. Take photos to show the results of your windowpane test. See instructions below for performing a windopane test below.
Instructions with images here: http://www.thekitchn.com/bakers-techniques-how-to-do-th-70784 and here
http://slice.seriouseats.com/archives/2010/09/technique-the-windowpane-test-for-pizza-dough.html
Shaping the dough
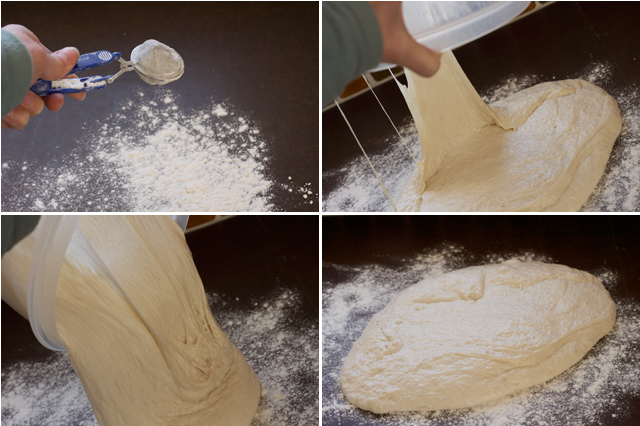
1. When the 1 hour rise is complete, spray a rubber spatula or bowl scraper with non-stick cooking spray. Fold the dough over itself by gently lifting and folding the edge of the dough toward the middle. Turn the bowl 90 degrees, and fold again. Turn the bowl and fold the dough 6 more times (for a total of 8 times). Let the dough stand for 30 minutes.

~ images from https://www.browneyedbaker.com/ciabatta-bread/
2. One hour before baking, adjust an oven rack to the lower-middle position and preheat the oven to 450 degrees F. If you have a baking stone, you can use it – put it in the oven now. Put another rack in the bottom rack position in the oven and put an empty rimmed baking sheet or dish on this rack (this sheet/dish is for the water/steam, later). Lastly, boil some water in a tea kettle or pot.
2. You are going to split the risen dough into two lumpy loaves: Using a flat, firm rubber/plastic spatula or scraper that has been sprayed with cooking spray, guide HALF the kneaded, risen dough onto one side of a baking sheet covered with parchment paper, piling the dough up into a sloppy rectangle/oval until it is ~2 inches deep at the center. Use the hard edge of the spatula to ‘”cut” off the dough when you have half. Do the same with the second half. If your baking sheets are small, then put each loaf on a separate sheet.
3. Use your oiled spatula or hands to gently shape each lump into a rectangle.
Baking the Bread
1. Earlier, you should have preheated the oven to 450F, and placed one oven rack at “lower middle” and another at the bottom position. The lower of the two racks should have an empty baking sheet or dish.
2. Measure out approximately 2 cups of very hot or boiling water.
3. Place the baking sheets in the preheated oven (or slide the parchment onto the preheated stone). Immediately after, pour the two cups of hot/boiling water into the empty baking dish/pan on the lower rack. The hot water creates steam – the steam keeps the surface of the dough from hardening too quickly, which allows the dough to expand more.
4. Bake until the crust is deep golden brown and the loaves register 210 degrees F when a kitchen thermometer is inserted into the lower third of the loaf – about 22 to 27 minutes.
5. Slide the parchment with the baked loaves onto a cooling rack and allow to cool completely before slicing.
For your Blog:
- Combine photos with text into a complete narrative.
- Take final photos
- Of your completely cooled loaf that has been sliced open with a serrated bread knife
- Take a closeup photo of the bread interior, showing the holes.
- Take a closeup photo of the bread exterior – is it thin and crunchy?
- Post a video in which…
- You describe the texture of your bread. Does it have the large holes inside – characteristic of the very wet dough?
- Describe what went really well during your bread making
- What would you change if you repeated this process again.
- Answer Questions
- Answer the question – why are the holes in the bread so large? Consider liquid content and gluten formation
- What chemical outcome did the windowpane test demonstrate?
This recipe was adapted from the following resources:
https://cooking.nytimes.com/recipes/4678-food-processor-ciabatta
https://www.browneyedbaker.com/ciabatta-bread/
https://food52.com/recipes/30564-ciabatta

